Showing posts with label DIY. Show all posts

Tuesday, June 23, 2015

Happy birthday sewing machine! and how to make a mattress

In honor of my sewing machine's 21st birthday (and by extension, my 30th), I'm posting the directions for how I made the two twin mattresses in our guest room.  Happy birthday sewing machine!  It seems like I got you only yesterday, and now you're old enough to drink...

100% cotton, chemical free, handmade mattress
WARNING: What follows is a long detailed post about how to actually make a mattress based on the directions in Making a Cotton Mattress: An Aid to Extension and Village Workers in Many Countries created by the USDA in 1966, which I originally found at Root Simple.  The original notion that this was a doable project came from a post at a blog called Butterpies.

For the first mattress I followed the directions in the USDA manual exactly, except in cases where the directions geared towards the developing world in 1966 didn't apply.  For the second mattress I made a few adjustments.  Below is a basic outline of what the USDA manual says with my amendments.

Making a mattress is a lot simpler than you might think.  By far the hardest part was finding the right materials, especially needles.  The rest is just time (about 13 hours if working by yourself).

You will need: 

- 5.5 to 9 yards of fabric, depending on how wide your fabric is (see manual).  The manual recommends that the fabric should be at least 8 oz.  I bought an entire bolt of 10 oz canvas from Big Duck Canvas Warehouse because a) they had a special on it and b) they sent me free samples of canvas in different weights and generally had amazing customer service.  10 oz is heavy, especially after washing.  Most ticking fabric I found (the pretty striped kind you associate with an old fashioned mattress) was 7 oz.  Probably would have been okay, but I figured for the amount of work I was going to put in, I wanted something durable and easy to clean.  No regrets about going with the canvas except that it shrunk more than I expected (in cold water, line dried) and was a pain to iron after washing.  In hindsight, just iron it enough so that you can cut it more or less accurately and the rest of the wrinkles will work themselves out from being pulled so tightly.

- Stuffing.  The USDA manual recommends 35 lbs of dry, loose cotton, because in 1966 Brazil you might have that lying around.  I went with cotton upholstery batting from onlinefabricstore.net.  White Lotus also has a whole array of stuffing materials that I considered, and they were a close runner up in terms of price for cotton.

Environmentally, cotton is a pretty destructive crop to grow.  It requires a lot of pesticides and water and destroys the soil it grows on. Organic cotton (which at least removes the pesticide issue), is incredibly expensive.  "Green" cotton claims to be remnant cotton that is scraped up from the floor of the mill and would supposedly otherwise be thrown out.  White Lotus specifically advertises its cotton as "green", however after a bit of research, it seems like any unpunched batting you buy mostly comes from leftover cotton that can't be used for anything else anyhow, whether its advertised that way or not.  I didn't verify this...I just used it to justify to myself going with the lower cost non-green, non-organic batting.

The cotton bundles from onlinefabricstore.net claim to be 13 lbs each (I did not weigh them).  I used 3.5 bundles per extra-long twin mattress (45.5 lbs).

I considered using a layer of wool.  Organic mattress companies have a lot of good things to say about wool: fire resist, water resistant, temperature regulating, naturally bed bug/ bed mite resistant. I believe the first two claims, and am willing to accept the third one.  As far as bed mite resistance goes, I found some journal articles that suggested the opposite, got frustrated, and then decided I could always make a mattress topper our of wool later.

- Thread.  Get a good, heavy quality.  It's going to be under a lot of pressure from the stuffing.

- Strong cord. I got button twine that was specifically advertised for tufting from Tedco Industries (item TW-TU02 in their 2015 catalog).   DO NOT skimp out on this.  Tufting is the second most time consuming part of the whole mattress making process and if your tufts break, you will cry.

Seriously.  Don't buy cheap needles.
- Spear point tufting needle.  The first mattress I made was almost a disaster because I originally bought what was labeled as a "tufting needle" from Walmart (the only store that carries sewing supplies nearby).  I might as well have been trying to sew with a pipe cleaner or a chopstick.  I bought some needles off Ebay that weren't much better.  In frustration, I consulted Butterpies' blog to see if she had any advice, but all I could find was a picture of a small child easily pushing a needle through a mattress.  Why do you taunt me Butterpies?  Why?  J tried to help, but just snapped my second to last needle in half.  Together we researched how to sharpen needles and learned a lot of fun facts about how to be a safe heroin user.  Educational, but unfortunately nothing described there worked on cheap sewing needles.

I finally ended up on the website of a commercial needle manufacturer that only sold in bulk (unfortunately I don't remember who this was).  I called the number on their website and someone really nice talked me through needle selection and then gave me the names of a few people that they sell to.  One of these was Tedco Industries.  Their customer service and shipping rates were pretty terrible, but they got me what I needed- an 8" single spear point straight needle, part #TL-N08SS.  The USDA manual recommends a 16" needle, but I found the skinnier 8" easier to push through my 5" mattress.

- Curved needle.  The USDA manual recommends 7".  I ended up soldiering through both mattresses with a shorter, skinnier curved needle from Walmart and then the 8" tufting needle.  A spear point, decent quality curved needle will make things go a lot faster.

- Pins, tape measure, scissors, sewing machine.

- Platform for working on.  Ideally you need something where you can pass the needle through the mattress and grab it from the underside without lifting the mattress. I used a pop-up trundle bed frame. The USDA manual recommends wood slats supported on something.

Abbreviated How To 
(see USDA manual for details)

An honest look at the mess you'll make.
If you find yourself reaching for a power drill
and/or hammer, reassess your life.
Note: cotton fluff takes FOREVER to get out
of carpet.  Work on a hard floor if you can.
1. Decide how big you want your mattress to be (length x width) and cut two pieces of cloth to those dimensions plus 1.5 inches for every foot in length and width (so if you want a 6' x 4' mattress, cut your fabric to 6' 9" x 4' 6").  You'll want to round the edges on these.  There is a pattern for round edges in the USDA manual if you want to be exact, otherwise just make the same nice gentle, mattress like curve on all four corners.

2. Decide how thick you want the mattress to be and create a long strip of fabric 1" wider than that.  Calculate the perimeter of your finished mattress. For every foot, add 1.5".  That will be the length of your strip of fabric.

The USDA manual is for a 4" mattress, which seems really thin compared to today's standard foam-core mattresses.  The first mattress I made was 4", the second 5".  If you're going for a firm mattress (I was), I think 4" or 5" is fine.   The comfort will really depend on what sort of bed frame you have. For a softer mattress, you want something thicker so that you don't sink through and feel the bed slats under you.

3. Cut four pieces of cloth for handles that are 5" wide by however thick your final mattress will be plus 1".

4. Follow the directions in the USDA manual to sew this all together.  Basically you are going to make a box, but only sew the top on one side (so a box with a lid).  Be sure to sew the handles into the edge seems.

5.  Make some cotton tufts.  The manual recommends just balling up some cotton (56  pieces for a twin mattress...more for a large mattress or if personal preference dictates.  Luxury mattresses like to advertise more tufts).  I decided to roll my cotton tufts in little squares of cloth and then sew them shut.  It looked nicer and sturdier.  The manual wants you to make marks with a pencil for where to put your tufts on the fabric prior to sewing.  I found this faster: after sewing, lay out your sewn mattress box on the floor with the top and bottom pieces perfectly lined up (the top is the one that you haven't completely sewn shut yet).  Mark where you want the tufts on the top piece with a pin (going through both pieces of fabric) and a pencil mark.  Flip the whole thing over and put a pin through what is now the top piece of fabric wherever there is already a pin.  Flip everything back over and remove the pins that were going through both layers (leaving the pins in the single bottom layer). Your tufts are now marked on the bottom with pins and on the top with pencil.

6. Spread your empty mattress box on your work surface and carefully layer your stuffing inside.  Try to be systematic and make nice even layers, occasionally adding an extra layer going vertically down the middle and varying where the the pieces join in each layer.  Wrap the edges of the batting into the corners when starting a new layer so that the corners are extra stuffed.  If you're using batting, you shouldn't have to beat it into nice even layers like the manual describes, since the batting is already flat.  Note how mounded the middle the mattress looks in the pictures in the USDA manual at this stage. The batting doesn't have to be quite this mounded, but you want some mounding or else you will end up with a mattress that sinks in the middle as it wears.  I used about 45 lbs of cotton for both my 4" and 5" thick, extra long, twin mattresses.  I would sleep on concrete if J would let me, so I'm not a great judge of softness.  I consider the 4" mattress comfortable and the 5" slightly soft, but still comfortable. The half dozen house guests that have slept on them have described them both as very to moderately firm.  Butterpies used 18 lbs of wool for a 2" mattress, the USDA manual recommends 35 lbs of cotton for a standard 4" twin.

7. Sew the remaining three sides of the top shut.  I used the button twine for this.  Hand sewing takes forever.  Get a friend and sew towards each other from opposite sides for both this and step 10. A good needle will save time.  I ended up reverting to my fancy 8" tufting needle because the little needle made my fingers sore and I didn't have anything better.

Hand sewing the edge
8. Don't lie on the mattress!  You're going to really want to.  Don't! Don't do it!

9.  Lace the mattress.  The manual tells you to do this with one piece of thread.  Instead, I pulled individual pieces of button twine down and back up through each place I needed a tuft (where the pencil marks are on the top).  The manual says specifically not to do this...I don't know why.  If you used pins to mark the bottom in step #5, you can just feel for where you need the needle to come through on the bottom rather than looking underneath for a pencil marks.  Make sure the piece of button twine is long enough that it won't accidentally get pulled back through the mattress while you're tightening things up in the next step.  Loosely knot the two ends of twine for each tuft on top of the mattress.

10.  Create a rolled edge to firm up the mattress and make it sturdier.  I used button twine here and didn't attempt to force stuffing into the rolled edge as the manual describes.  This means that I ended up with more of ruffle going around the edges than a roll.  Functionally, I don't think it makes a difference, but it probably would make your mattress look like it has a crisper edge under the sheets (mine is kind of floppy and futon like). First you'll "roll" the edge on the top, then flip the mattress over and roll the edge on the bottom.  The directions in the USDA manual are kind of confusing, basically think of "rolling the edge" as making a ruffle around the entire edge (either with stuffing squeezed into it or not), where the seems for the "ruffle" are 2.25" from the edge of the original edge seem on the top and 0.25" from the original edge seem on the bottom.

11.  While the mattress is flipped bottom side up, insert your cotton tufts under the loop formed by the button twine you pulled through at each marked spot in step #9.  Remember to remove all the pins.  Carefully flip the mattress over again so that it is top side up.

12.  Tie the tufts.  My method for this was a bit funny.  You want them all tied with even tension.  Basically, I decided that the weight of my entire body was the most even pressure I could apply, so for each tuft, I climbed on top of the mattress, centered the knot between my two big toes, inserted a cotton tuft under the button twine, and tied it in place with a plain double knot.

Like it was there all along!  Note random copper pipe still waiting to be repaired from hydronic heating fail 2015

You're done!  You can now lie down on the mattress (assuming you didn't already in step 8).


Wednesday, March 11, 2015

In Which We Repair Our Electricity Using a Pickle Jar

We were in the kitchen a few days ago when I heard a strange noise by the wall. It sounded like perhaps rainwater leaking through the ceiling and coming down. Or perhaps a mouse or some small animal scurrying through the wall. Or a termite chewing wood? Are termites even active this time of year? 

It sounded almost like crackling. Almost like two electric wires sparking against each other. That must be it. The antiquated wiring in this house finally gave in, and our wires were sparking together. Soon, the electrical fire would begin and our house would be engulfed by flames. 

We sprang into action. L went to the electrical panel and started throwing switches one by one, while I stood by the wall and listened for the  crackling noise to stop. As she took out circuit after circuit, the noise continued. Could they have wired this house so that this circuit came from the other electrical panel? Was it somehow hardwired in? 

Then I looked down at the pickle jar. The pickle jar that I had taken out of the hacked chest fridge not long before and placed on the counter. The pickle jar that, as it warmed up, was slowly releasing gas from a small gap between the jar and the lid, making a distinctive crackling sound.

The offending pickle jar.
Also featured: greens from Priapi Gardens, kefir, "Lucky Duck" wine, and a bunch of eggshells.
It actually turned out to be for the best, because a few weeks ago we tried to install a new dining room light switch (the old one was a dimmer switch, which wouldn't work with the ultra-efficient LED light we were also installing).  We shut off the circuit, took out the old switch, and after much cursing and fighting with the wires (which were actually old) managed to get the new one installed. Which promptly did not work. Furthermore, half the ceiling lights in our house did not work either. We couldn't find a solution to this problem, and so we just got some lamps at the second-hand emporium and plugged them in where we needed them.

The exercise with the pickle jar taught us the valuable lesson that when you turn a circuit off at the electrical panel, and subsequently forget to turn it back on, it will remain off and your electrical appliances will not work.

Therefore, pickles are delicious. Q.E.D. 

Wednesday, February 25, 2015

Energy Efficient Refrigerator Hack

We mentioned in our last update that we are a bit obsessive about energy use.  How obsessive? Prior to all of the drama with our frozen pipes, we made a list of every appliance and phantom load in our house, its likely energy consumption in watts, and how many hours per day each appliance is in use in low, medium, and high energy consumption scenarios.  It looked like this:


We then compared our range of total daily energy consumption from the table to our actual daily energy consumption from our electric company.  The numbers matched up pretty well, although our actual allocation of energy use to specific appliances is just a ball park estimate.

Of course, we could have used an actual energy monitor that plugs into each individual outlet or our circuit breaker, but we don't have one and its probably for the best given our tendency to overanalyze...
 

High scenario: The 'computer' category assumes that we leave our desktop with an old monitor plus two laptops on for 24 hours (and the monitors don't go to sleep).  The heat lamps and light in our well house are only on when its cold, but when it is, they're on all night.  We're assuming that its cold AND wet, since the sump pump in this scenario is also working pretty hard.  "Plants" refers to the fluorescent grow lights we use for seedlings.  Our oven is gas powered, but has some auxiliary electric. We don't have cable or TV (see computers), which would be big energy consumers if we did.

What stands out in all of our energy use scenarios is that our ancient water heater and refrigerator account for over half of our electric bill. 

The water heater is going to have to wait for a little bit, as its a slightly larger purchase that will involve some professional plumbing and electric help and the payoff for switching it out isn't as immediate.

However, any excuse to get rid of the old, loud, big, in the way, difficult to close refrigerator! We did some research and what we found was disappointing.  The most efficient Energy Star non-dorm sized refrigerators (over 7cu ft) start at 249 kWh/yr, with most using over 300 kWh/yr.  That isn't so much, but in comparison, similarly sized chest freezers start at 189 kWh/yr to keep food substantially colder.

Most of the difference has to do with the basic layout.  When you open a chest freezer, most of the cold air stays down at the bottom, whereas when you open a standard refrigerator door, all of the cold air comes pouring out towards you.  The chest freezer is also better insulated and you never have to worry about the door popping open (unless you over pack it).

Chest freezers are also substantially cheaper, as they are basically just a box.  No shelves.  No drink dispenser.  No ice maker.  Just box.

So we did some thinking.  Our kitchen is small and limited in counter space.  Pretty much any upright refrigerator would partially block our lovely wall cabinet.  How attached were we to conventional shelves?  We pretty much only use the front 6" inches...the backs of the shelves being a graveyard for unlabeled jars and old mustard.  Did we want a drink dispenser? no.  Did we want an ice maker? no.  Did we even want a freezer compartment?

An investigation of our freezer revealed 10 ice packs, a single Tupperware of frozen berries, and 6 zip lock bags of malted barley from the last time we made beer.  But what if someday we want to buy ice cream?  What if someday we actually have leftovers that stick around for more than two days?

We ultimately decided on buying two chest freezers and a temperature controller (still cheaper than one refrigerator).  The larger chest freezer came with an energy rating of 248 kWh/yr.  Not particularly good for a freezer, but still better than the best refrigerator, and for our purposes it doesn't really matter.  We hooked it up to the temperature controller, and voila...a 7.2 cu ft, better than 248 kWh/yr, refrigerator.

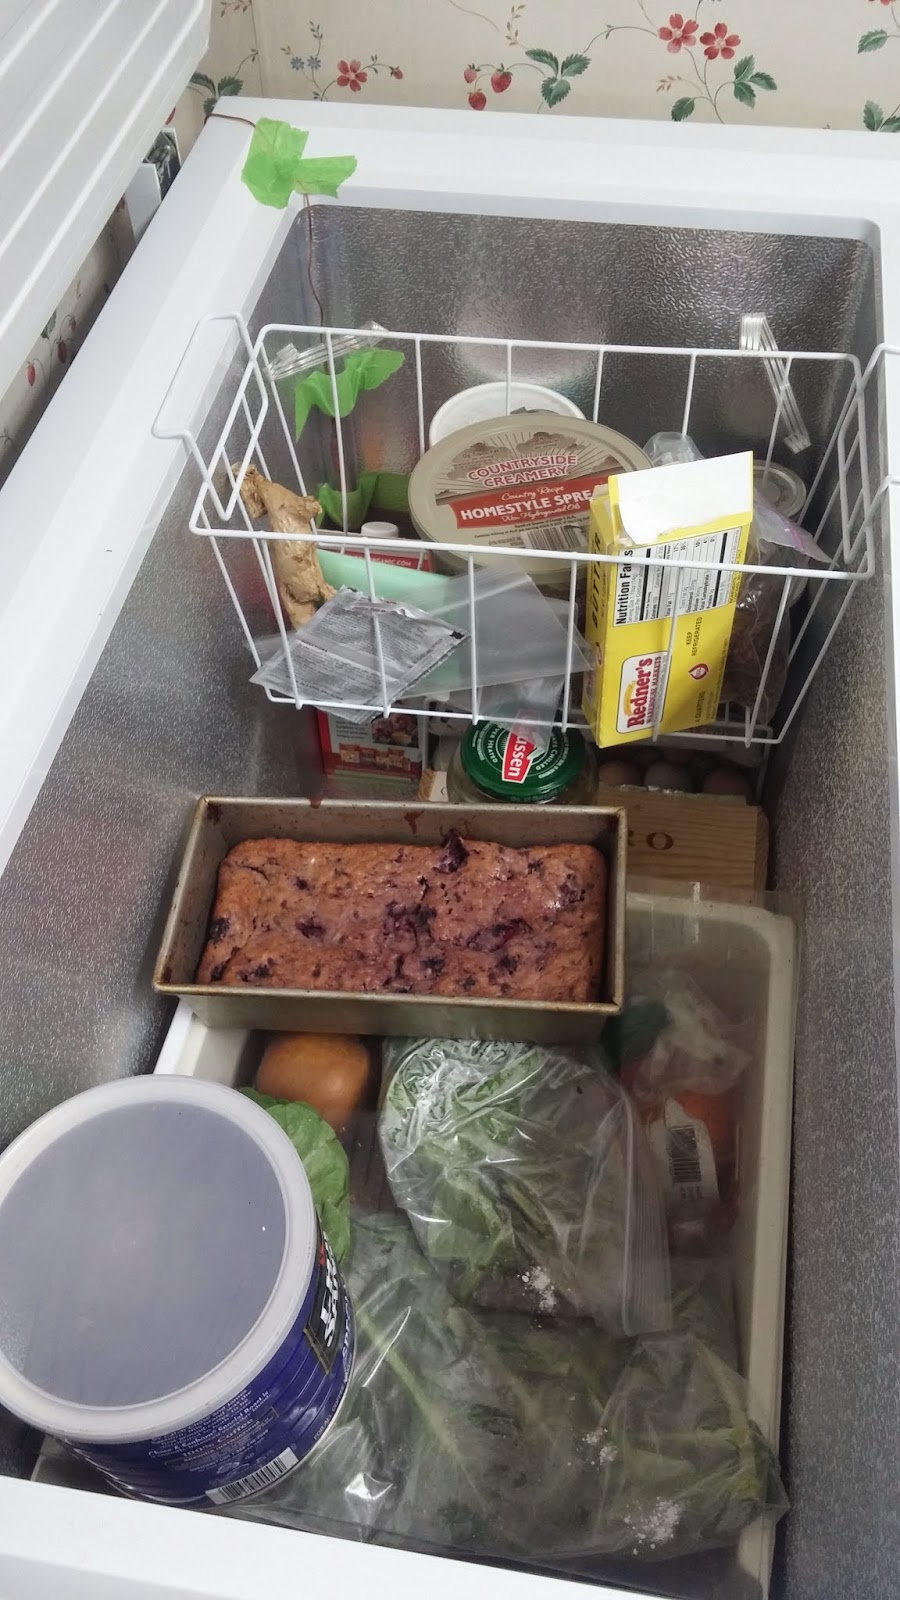
We stripped our old refrigerator of its shelves and made a sort of sliding box system inside of the chest freezer...ahem...refrigerator. 

Somehow I never took a good picture of our old refrigerator before we moved it, so this is the most comparable before-after I can come up with:

            Before                                                    After

You can see the discoloration on the floor where the old refrigerator used to be.  The new chest refrigerator takes up about the same floor area as the old refrigerator, just in a slightly different orientation.

In the back corner we have the temperature sensor part of the temperature controller hanging inside of a plastic tube we happened to have (for protection) and not so neatly taped in place with painter's tape.  The actual temperature regulator sits in the corner behind the refrigerator.


On the top layer we have a basket that slides from side to side.  We're looking for a few more baskets with compartments to organize and store things we use often more securely.  The current basket is a bit of a mess.
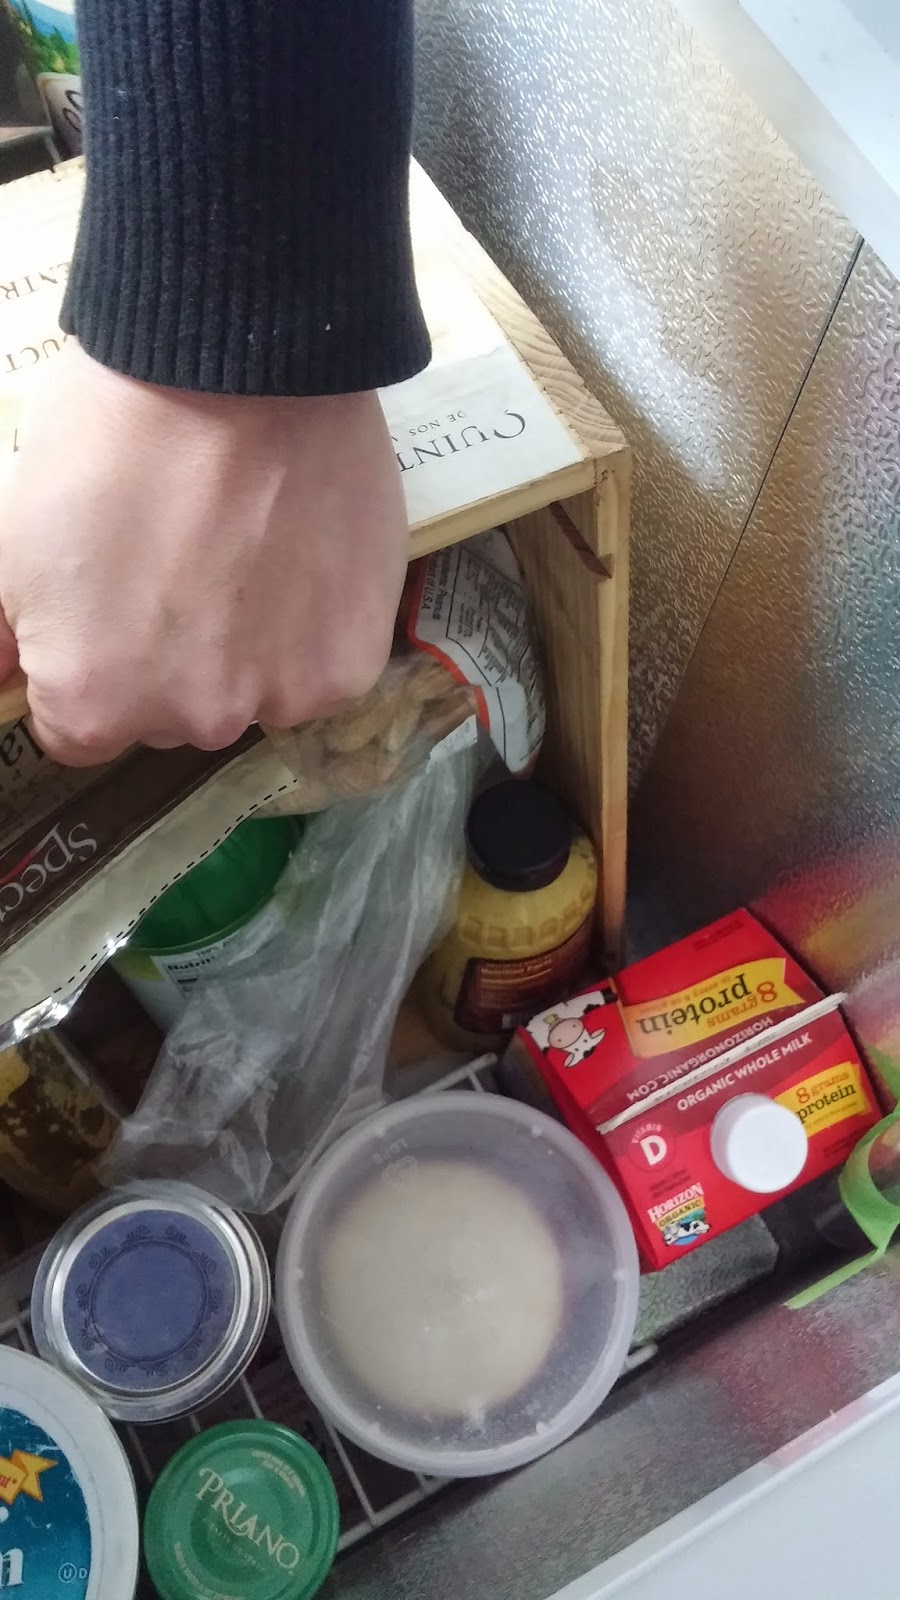
On the second layer, we have a drawer from our old refrigerator (with glass shelf on top for a cover).  The glass cover slides over to give access to the contents of the drawer.  The entire drawer also slides out of the way to give access to a third layer (milk crate covered with freezer shelf).


For now we also have another crate on the bottom layer that can be lifted up to rest on the built in ledge

Kind of a clunky first pass at organization with materials we have lying around.   Once we have an idea of what works well for us we'll think about building something more permanent.  This is probably as full as our refrigerator will ever get, since we had an amazing, large CSA basket gifted to us today by the same incredible person that helped us track down a plumber.
As for the freezer, we ordered a smaller Energy Star chest freezer that we'll keep somewhere out of the way and only use as we need it (or get a second temperature controller so it can double as an overflow fridge).   We ate the berries we had frozen and are feeding the defrosted malted barley to the chickens (who LOVE it).


Some of the other old refrigerator shelves have temporarily been installed in our utility/laundry room to hold our garden seedlings.  No shelf in our house is safe from plants!

Keep reading:


Monday, January 26, 2015

LG G2 cracked screen repair: The limits of DIY

Waaay back, several weeks ago, we started this blog to talk about chickens and homesteading, and random projects, and just keep people up to date on our lives in general. 

We also posted a picture of my cracked cell phone being controlled by a mouse, because it looked ridiculous and was therefore sort of funny, and we were going to have it fixed in no time anyhow...

Phone attached to mouse.  The glass was cracked on the bottom right and didn't respond to touch.


Three weeks, three parts, and some professional help later, my phone is finally fixed.

What I learned:
- The front of your phone consists of a digitizer (the glass part) and the LCD (underneath the digitizer).  If you drop your phone and it doesn't respond to touch anymore, you broke the digitizer.  You can get a connector to plug your phone into a USB mouse and continue using it that way.  This is fun and novel for awhile, but extremely ridiculous if you try to answer your phone in public. 

- If you drop your phone and there are problems with the image on the screen, you damaged your LCD.

- All of the major phone carriers sell slightly different models of the LG G2.  All of the models require slightly different parts.  This means that physical stores don't bother stocking the parts.  You can find out what model you have by taking off the back of your phone and looking at what is printed on the orange strip next to the battery.

- All LG G2 models are held together by an excessive amount of glue.  Said glue will not prevent your phone from breaking when you drop it.  It will make professional repairman extremely reluctant to help you when it does break.

- As much as I hate to say it, if you're a clumsy person in the market for a smart phone, consider a popular model, such as the iPhone or Galaxy.  It will make your life much easier when you inevitably have to repair it.

- If only your digitizer is broken, you can save $20 by buying only the digitizer (rather than a digitizer-LCD assembly) and try to pry the old broken digitizer off of your working LCD. You may succeed, or you may totally destroy your LCD and be back at square one.  Heed the warnings in the product review section of the part your are ordering.  If you have an LG G2, see above note about glue and consider carefully the fact that most professionals wont attempt this.

- Replacing the digitizer-LCD assembly (e.g., replacing both parts rather than trying to pry them apart to save one) is very easy, assuming you select the correct model and are sent a working part.  There are already tutorials for every possible phone model already online.  However, LCD screens are finicky and based on reading online product reviews, its quite common to get a defective part.

Tutorial for replacing the digitizer-LCD assembly on the LG G2
(Note: In the image here the ribbon cable connectors highlighted in orange go to the digitizer while the red one down by the usb port goes to the LCD.  The flap between the LCD and digitizer connections is empty and doesn't do anything.  If you get through the tutorial and you can see the screen, but touch doesn't work, check the digitizer connections.  If you can't see the screen at all, check the LCD connection)

40 minute youtube video of a guy separating the digitizer and LCD
Follow directions on previous tutorial to completely remove the digitizer-LCD assembly from the frame and other components before attempting.

What happened:

Day 2 of having chickens, everyone was very excited for us and requesting pictures.  I thought I would oblige...but I also needed to take the compost out...and chicken treats...and I think some other stuff...and as I tried to shut the back door, I dropped my phone on the cement patio.

The local Radioshack wouldn't repair my phone model and the only place that would was at the mall (which is far), and they were going to have to order the part anyhow.  Such is my hatred for the mall, I ordered the part and attempted the repair myself. 

As you might glean from the What I Learned section, I ordered only the digitizer.  The repair began with removing the broken digitizer-LCD assembly, and then trying to melt the glue holding the two parts together with a hair dryer while carefully prying them apart.  This went well for awhile, but I think my LCD was also slightly damaged and weak in one corner.  It ended up cracking.  I might have succeeded had the LCD not been damaged, but it turns out that trying to melt the glue and pry things apart turns what could be an easy 20 minute repair into a risky 1-hour project.  At least this was the case for the LG G2, I read elsewhere that other phone types use less glue.

I ordered an LCD-digitizer assembly.  It took longer than it should have to arrive.  I tried to install it, but for the life of me could not make one of the ribbon cables connect.  I was convinced I had the wrong part because the part I was sent had a different part number from what I was replacing.

For the record: P/N 6841L-0365A(ASS'Y) 6850L-1071A(Bare) can be used to replace P/N 6841L-0365B(ASS'Y) 6850L-1071B(Bare) on the LG G2 D800, D801, and D803 models.

The company sent a new part: the same part, only attached to a new front frame this time (making the repair more difficult).  In frustration, I went to the mall.  I even drove there in the snow.  The technician confirmed the first part was defective and then installed the second one for me.  I bought a case and was charged $15 for the repair (I was originally quoted $150), perhaps because I was the only one there as the store opened on a snowy weekday morning and came with the part and my phone already disassembled.  Perhaps because I looked like I was at my wit's end and  almost hugged the guy when he finished.

I didn't escape the mall unscathed though.  As I was leaving, I passed a kiosk handing out samples of lotion.  As I reached out to take one the saleswoman grabbed hold of my hand.  "My God! Look at your nails!" she cried, as she began to buff my right thumbnail with a fancy emery board she'd been hiding somewhere.  Then she told me about some Dead Sea salt products that fell in price from $60 to $20 before I managed to escape without buying anything.  Incidentally, my one fingernail looks awesome.


Wednesday, January 7, 2015

Embracing the unkowns

There were quite a few unknowns when we closed on the house last month- like the painted shut cupboard wedged behind the refrigerator that we couldn't move without damaging the plumbing.

This is why we couldn't move the refrigerator.  Who thought this was a good idea?

We ultimately decided that there probably wasn't anything in the cupboard bad enough to deter us from buying the house.  But what was in there?  Dead mice? War bonds? A 100 year old fruit cake?

Door to Narnia

It took us a little while after move-in to get around to it, but finally, with the help of a screwdriver, a butter knife, and a little violence, we were able to pry the cabinet open.
And...

Surprise!

 ...a solid wood ironing board fell out.  Neat!

Unfortunately, as much as Jan enjoys ironing and Lisa appreciates the space saving aesthetic, it didn't take long to decide it had to go.  A couple more weeks of getting around to it, a power drill + more low-level violence, and here is what we have now:

All the things that usually get lost in the back of the cabinets.

We bought a variety of plastic shelf pins to hold the shelves in place because we didn't know which ones would be best.  They all ended up being about the same.  We drilled the holes one drill bit size smaller than the pin size to get a snug fit.


The best part is that Lisa can reach all of the shelves! Every house should have an in-wall cabinet like this. The upper cabinet shelves in the rest of the kitchen have been officially relegated to Jan's personal storage.  He will use them solely to cache old bread and open jars of jam.  Lisa doesn't care.  As far as she knows the top shelf is where dragons live.

Jan likes this.

As for the refrigerator, we capped off and removed the line to the icemaker, so the fridge sits flush in the corner now.  Its still spray foam city underneath, but that's a project for another day. 

Now, who wants a wooden ironing board?

----------------------------------------------------------------------
Actual conversation:

J: Hey, you got a lot done in here!
L: Well, I was cleaning and had the drill out...

_____________________________________________________
http://www.pinkwhen.com/diy-sunday-showcase-131-favs/
http://www.niftythriftythings.com/nifty-thrifty-sunday-188/
http://www.ablossominglife.com/2015/02/frugal-crafty-home-blog-hop-113.html
http://diyshowoff.com/2013/07/21/that-diy-party-26/